HEAT EMBOSSING BASICS
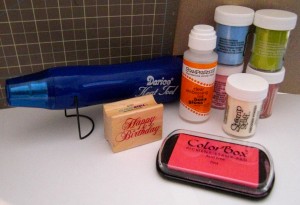
- You will need the following items to heat emboss: colored embossing powders, clear embossing powder, heat tool, clear embossing ink, slow drying (pigment) ink, heat tool and a rubber stamp.
- There are two ways to heat emboss 1) with clear embossing powder and colored pigment ink and 2) with colored embossing powders and clear embossing ink.
- In the first option stamp your image onto cardstock with a colored pigment ink. Quickly spread clear embossing powder over the top of the ink before it dries. Remove all excess powder and place back into your clear embossing powder container. Use your heat tool to warm the powder by placing it a few inches above the image. This takes very little time. You will know your powder is finished heating when it turns glossy. If your powder is over-heated it will dull.
- In the second option use clear embossing ink to cover your stamp. Stamp the image onto cardstock. It may be hard to see since the ink is clear, so be sure to press evenly over your image when stamping. Quickly spread a colored embossing powder over the top of the ink before it dries. Tap all excess powder back into your embossing powder container. Use your heat tool to warm the powder by placing it a few inches above the image. This takes very little time. You will know your powder is finished heating when it turns glossy. If your powder is over-heated it will dull.
- Always remove all excess embossing powder from your project as it will also turn glossy when heated. After dumping all the excess powder back into the container, tap the back of your image to ensure that all has been removed from around your stamped image. If there are still traces of powder, a small paint brush can be used to brush the excess away.
- If a spot on the image was missed with powder simply apply more to the missed area. Remember to move quickly once your image has been stamped. The powder sticks to the wet ink and will not after it has dried.
HEAT EMBOSSING HINTS
- When heat embossing, wipe away stray flecks of powder with a fine paintbrush before heating.
- Always stamp your image with a slow-drying pigment ink such as VersaMark, as it allows time for the powder to stick to the ink before you heat it.
- Be sure to pre-heat your embossing tool completely before using it. Hold at least 5cm away from your image.
- Lay your stamped card on scrap paper or in a tray before sprinkling the powder on the ink so that the excess can easily be returned to the bottle.
- Stamping in black ink then heat embossing with clear powder helps keep the fine details of your image.
EMBOSSING WITH FOLDERS
- To make your embossing stand out try inking the raised area or lightly sanding the raised area.
- To ink the embossed area use the back of a foam stamp that has been lightly rubbed over an ink pad. The back of the foam stamp is firm enough to stay atop the raised area without falling in between the spaces.
- Sanding works well on textured card with a white or different colored core. Sanding lightly over the embossed area reveals the core underneath.
- Ink the inside of your embossing folder before running your folder/paper “sandwich” through your embossing machine.
- Use Metallic Rub-Ons. After your card has been embossed with a folder, use your finger to apply a metallic rub-on over the raised portion. You can use one color or several blended together. Metallic rub-ons are creamy which allows easy blending. After the rub-on has been applied, use a cloth to buff image and remove any excess rub-on.
- Put a sheet of double-sided adhesive onto paper and run it through your embosser with an embossing folder. You can then cover your embossed design easily with embellishments like metal flakes or micro beads.

